


 |
| Historic Museum Cabin at Cades Cove in TN., LOC. |
When choosing a home, years ago, the family often looked at the land and the location rather than the house. The men would often build the house themselves (using their own trees) or fix up an existing structure. This was done over a period of time. The most important work would have been to plant seeds in the ground to grow food to feed the family, and to have shelter to keep the family safe and warm. It was generally the mother who did the decorating and little touches of beauty to make the place cozy and restful for the family.
Many years ago, in the 1990's, I visited Cades Cove in Tennessee. I saw the rustic cabins on display. The land and the scenery were stunning and restful. It was an old-fashioned way of life.
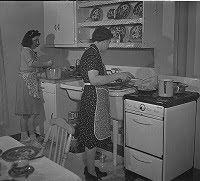
In 2015, we stopped at Dollywood in Tennessee. There is a little museum showing a replica of the childhood home of the park's founder. The decor is humble and homemade. Yet it is charming and cozy. It gives one a sense of what daily life was like for a homemaker, long years ago, as she made her home pretty and took care of her family.
Over the years, in different states, I have visited many museums and old homes of the poor, the middle class, and of the rich. It is inspiring to see how each managed to make their homes look pleasant.
 |
| Replica of interior of home at Dollywood in TN. (From my 2015 trip.) |
In these modern days we are exposed to a great deal of advertising for paint, upgraded fixtures, and many ways to remodel and fix up our homes. It can make one feel overwhelmed or even discontent with one's own way of life. It does not have to be this way.
A clean, organized home should be the goal for every homemaker. From there, we can use our skills to rearrange furniture and make the rooms look as pleasant as possible. I have also found that basic sewing can make things look pretty.
The goal here is to make the home look pretty without spending any money.
Last month I found an old piece of fabric. It was floral and beautiful. I thought it would help make one of the rooms look extra nice. I decided to make a set of decorative pillowcases and a small curtain. The curtain would be used to hide what is on a lower shelf of a bulky old computer desk. I have a printer on that shelf that looks unpleasant. I do not want to see these types of machines or even a computer in a room. I find it stressful. The curtain would bring beauty to the desk while keeping the printer in a practical location.
Here is a photograph of the finished curtain:
 |
| Hand-sewn curtain for my old desk. |
In order to make things specifically for our own homes, these have to be custom made. To make a basic curtain, we only need to measure the length and the width of the window or area where the curtain will be placed. In addition to this, you would want to add about 3 inches to the top, and perhaps another inch to the bottom. Once the fabric is cut, you simply hem it all around, on all four sides. Next, the top is folded over by about 2 and 1/2 inches or so to be sewn in place. This will create an opening at the top for the curtain rod. Be sure to make the width of the curtain much wider than necessary. This will show a plentiful look to the fabric and a "bunching up" look at the top of the curtain.
When making pillowcases for decorative "throw pillows," which are commonly placed on chairs and couches, choose pretty fabric that will add beauty to the room. If you do not have any fabric or are not interested in sewing, you could simply take one of your regular pillowcases for the decorative pillows to add a pretty touch to the couches and chairs.
It is an honor and a joy to "play house" in real life as we set up our homes, clean, organize, prepare meals, and serve our precious families.
Blessings
Mrs. White
From the Archives -
Organizing - A Home Without Clutter.
Practical Help - The Secret to a Clean House.
Peace and Simplicity - An Ordinary Life at Home.
- To find out more about this blog, or Mrs. White, please visit our About page. -

Help For Homeschooling:
Seeking a Thrifty and Simple Life: Encouragement for Christian Homeschooling by Mrs. White
Paperback, 112 pages
As you read this book, I hope you get a sense that, no matter what is going on in the world, every home can be a homeschool.


10 comments:
We have visited Cades Cove and I found the historic village so fascinating. Like you, I admire the rugged people of the past who forged a simple way of life under sometimes difficult situations. Blessings, Mrs. White!
This is pure joy to me!
Your curtain turned out delightful.
I believe any place can be made more lovely if we have some pretty fabric, with added ruffles or lace, and flowers. Of course there are lots of other things that help too, but these are the extra touch and I think anyone can have some. 💌
When my daughter started school I wanted to turn her room from a tired nursery into a 'big girl's room'. The cream walls were grubby, but I didn't have enough cream paint to redo them and had no money spare to go and buy some. I found 2 small sample pots of pink paint in the garage, poured them both into a bowl, mixed well and used an old sponge to sponge paint the walls, especially the grubby bits! I took a pretty pink tablecloth embroidered with daisies by my aunt and folded it to form a cover for a small shabby bookcase, then pinned and sewed it. I put an old mirror on it and that became her dressing table. I used an offcut of carpet from my living room to make a bedside rug and left the curtains, which were a pastel patchwork design, in place. The whole thing was really pretty and she was thrilled. Years later I undid the sewing on the tablecloth and returned it to being used as it was intended.
The fabric is so pretty. I have old kitchen cabinets and about 3 or 4 years ago, one of the doors became weak and finally fell off. I took the accompanying door off and used a lacy fabric I had to thread thru a small curtain rod and hang where the doors used to be. Well, it ended up looking so pretty that I purposely removed the doors under the sink and did the same thing to balance out the look. I just loved the feminine touch it gave to the kitchen! Isn't it such an honor to be in charge of such tasks? ~smiles~
I have always loved making things for my home, and have baskets of cushions (pillows) made for outdoors, patchwork quilts for grandchildren, cross stitch pictures... Things that we make ourselves always seem to have more value than bought items. Like you, Mrs White, I dont like to see things under worktops, and recently made curtains to hang under a worktop in my Garage, housing picture frames and some garden things. It looks much more attractive now!
As one of the posters mentioned above, I also sewed curtains for my lower kitchen cabinets. My husband and I designed and built our own house (literally built it by ourselves with a little help from friends and relatives). Shortly after we moved in and began to finish the kitchen cabinets my husband was diagnosed with stage 4 bone marrow cancer (multiple myeloma). He was far too sick to do anything after chemo twice a week for 3 years and radiation almost daily on several occasions for bone tumors. We couldn't afford to have anyone finish the cabinets either. And I am definitely not good with power tools. One day at a fabric store I saw a bolt of 35 yds of light blue and white gingham for $1.00/yd. I sewed curtains for the cabinet bottoms and bought inexpensive spring tension rods to hang them on at Menards. (We kept the upper cabinets open by choice) Total cost was about $50 for this project. At first I thought it was too much fabric for the kitchen, but I got used to it. Then people who came to visit exclaimed over how cute and "country" it looked. So it was OK!
I have sewn curtains for every room of the house, made quilts, crocheted rugs, embroidered table runners and made cross stitch hangings. I think handmade items make a home look cozy and warm. A friend recently gave me some lovely fall/Thanksgiving themed fabric which I will use to make a fall quilt for the living room.
In case you are wondering my husband is now in remission for the past 8 years. Thanks be to God!
Our house is unfinished and I can't make real curtains for the windows yet, but I went to the thrift store and bought a queen sized bed skirt and used it to make temporary curtains. I also have made kitchen cabinet curtains in the past, as one of the other commenters reminded me. The last place we lived in didn't have a finished kitchen. My husband made a make shift cabinet base to put the counter top on and the he added shelves. I made curtains for doors. It worked just fine!
Having read your blog, you and your husband achieved a great deal whilst dealing with difficult circumstances and yet managing to appear cheerful and optimistic. Some time ago you mentioned in a comment that you believed God would give you sufficient strength to do what he wanted you to do. He has richly rewarded your faith.
Love seeing your homemade curtains, this is so nice that you are explaining how to make them and giving ideas. So many ladies don't think of these things if they grew up in a home where nothing was homemade.
Our home growing up was an older home from the 20s or 30s. One of the corridors to my bedroom was very tiny and had shelves on both sides My mother made dark brown curtains on both sides of the little corridor to hide the shelves where she would store little things. It had such a sweet homie feel and looked nice. My friends from the NASA area would come over and marvel at the little corridor and our quiet older home we had in an old neighborhood so different than their suburban homes.
Looking back, I was very blessed living in the older area.
Thank you for sharing, Mrs. White, it's such a pleasure to read and visit here. ~Amelia
Cades Cove has been one of our favorite places to visit over the years. What a beautiful piece of land and history. Over the years, I have always tried to sew my own curtains, usually because I want a certain fabric and the store bought curtains are never as pretty of a design. I'm a big fan of curtains to cover unsightly cabinets or doorways. Great idea to cover up your printer!
Post a Comment